 Legoaizer -
Help Legoaizer -
Help |
Legoaizer -
Help
User interface
Legoaizer
is easy to use. Basically there are two types of controls: buttons that show
a dedicated functional window, and the main menu bar on top. In
addition, the status bar at the bottom shows some actual information; the menu has
additional input and output controls. The Graphical User
Interface (GUI)
On top
you find as usual the main menu bar, o the left side you find 8
functional buttons; top-left the source picture is shown; in
the middle a large space is shown for the mosaic result picture (an
empty 'chessboard' at start); and finally on the right you find the
colour palette of the loaded brick-colour set. At the bottom you find
the status bar with information. On the left you find the name of the
loaded dataset (e.g. 'LegoNoFiles') and the current mosaic size in cm or inches.
On the right you see the date and time, and the selector in which unit you are
working (metric or inches). Finally the start button
to create the mosaic is
placed bottom left in the GUI.
Some
functional buttons are greyed out at start. These will be enabled after a
mosaic has been generated,
and when
a full valid (full) license was
found (e.g. Mondriaan and the Builder will be disabled for non-licensed users, but only
after the Grace Day period has expired). The icons on the left are actually buttons. When
you click on them a small window is opened, depending on the button the content
is refreshed with their functions. In some cases not a window of functions is
opened, but a dialog is opened, e.g. to open or create a picture library or a
set editor is created. The datasets are created on the fly, based on the current
selection of available colours and bricks/parts. For that reason these editors
take a few seconds to be created On top the main menu is shown, with the basic
controls for file management, exporting and colour/data tables. Also some tools
are available, like license information and skin and language selection.
Finally, on the top of the main viewer (the one that will show the
mosaic result) the cost estimation is shown. The information is retrieved from
the database numbers. It's the responsibility of the user to make sure these
cost numbers are accurate and complete. Zoom
bar The
little arrow on the left The
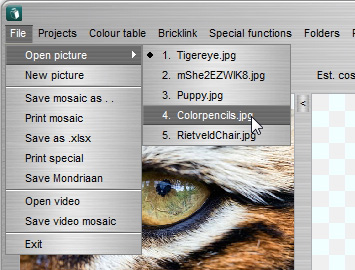
menu Picture above: the File commands in the menu.
Most conveniently the last opened 8 picture
files are remembered. Also other functionality is available, e.g. the resulting mosaic
can be printed, saved in a specific location; and the video
file can be saved.
This is
the full menu,
each with a short description:
The functional buttons
The colour selector Some buttons The follow-me text
option The status
bar
Picture above: the Status bar. On the right you see
the 'Metric' button. This sets
the metrics in the application: cm or inches. This setting is remembered upon
application exit; when metric is chosen the default print size ratio follows A4, while with inches the default
print ratio follows Letter (8.5 x 11 inch). The
real print size is defined when actually printing to the printer. Also
for pdf printing (e.g. using CutePDF) the print size is determined by the
destination file paper size settings.
At start the interface has several functional
areas. See picture below. ![]()

The large center mosaic
window has a couple of zoom controls. These are use to zoom in and out to
inspect and evaluate the quality and details of the mosaic blueprint. Especially
when the details of bricks placement and stability (e.g. interlocking of
Ministeck® parts) are inspected, this zoom function is helpful. 
A little arrow can be found next to the source picture on
its right. This arrow is a button, and when pressed the functional buttons and the source
picture will be hidden from the main window. This way the user can fully
study and use the main result viewer, with zoom etc functions. When this button
is clicked again the left part of the screen is made visible again.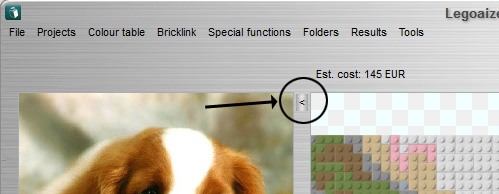
The menu is mainly used for
input and output, and also contains some useful tools. Most menu functions speak for themselves, or are
sufficiently explained in the chapter of the GUI. Some features are also
explained in more detail in this chapter. In all cases when the application is
closed all the relevant settings are stored as well.
File
Open picture: opens a submenu with the history of recently opened source pictures.
New picture: opens the dialogue to select a new source picture (more
help).
Print mosaic: opens the specific
printer interface to allow for printing the mosaic image on multiple pages (or just on one page).
Save as .xlsx: this option will allow you to save the mosaic as Excel
spreadsheet, in 2010 and later format. The advantage is to allow for
more colours than 56 (older xls format), but it's considerably slower. Only use when you really need more than 56 unique colours.
Print
special: save the building blueprint as .pdf per base plate with
brick amount data per page (more help).
Save
Mondriaan: save the Mondriaan painting as a bitmap
(only in .bmp file format).
Save mosaic video: opens the dialogue to save the
created video
file.
Open video: opens the dialogue to select a video file (the format must comply; see details in the video section).
Exit: exits the application, and stores the current
settings.
Projects
Open project: opens a dialogue to select one of the saved projects. The location is defaulted by the application (more
help).
Save project: opens the dialogue to save the current
settings, colours and everything into a new project file. The project files
are stored in a default
location.
Save
Mondriaan: save the Mondriaan painting design (areas, colours, size).
This is not the same project (format) as the mosaic itself where
the bricks etc is saved.
Open
Mondriaan: open a Mondriaan project. This will set the parameters of
the Mondriaan, without actually creating a mosaic. That is also different
with opening a mosaic project. You should save the Mondriaan
painting, and also save the mosaic is you want to completely store your
result.
Colour
table
Open table: opens the dialogue to select a new table.
The default location is used, but it changes with the location of the
current table
data set.
Save table as: opens a dialogue to save the
current colour table under a different
name.
Edit table: opens the table editor. Same function as
the button 'Edit
table'.
New
colour/brick table: create a new colour-brick combination table from
scratch (more help).
Bricklink
"Bricklink" colour
table: this will show the brick-colour table creator of Bricklink
from which you can conveniently create a new table yourself.
Export bricklink wanted
list: this will save the used brick data in a
bricklink specified xml file. You can directly upload this file to the
bricklink website (more
help).
Show "Bricklink" data:
this will how the current brick, colour and price database of the Bricklink
website.
Special functions
Colour filters: opens the functional window for the colour
filters, to tweak the way of how the source picture is
analyzed.
Video
creation: opens the functional
window for setting all the relevant video rendering options (more help).
Standard Colours: opens a window to manage colours from a different
kind of dataset (more help).
Source analysis: opens the functional window
for analysing the source image fro optimalisation of the mosaic colour selections (more
help).
Folders
Open Results folder: opens the windows explorer of the latest known folder of saved results (more
help).
Open Source folder: opens the windows explorer of the
latest known folder of a selected source picture.
Open Bricks folder: opens the windows explorer of the
latest known folder of the last loaded photos of bricks.
Results
Show saved mosaic: opens the saved picture into the default
windows picture viewer (more
help).
Open saved spreadsheet: opens the saved
spreadsheet. Only available when an instance of Excel or Excel reader is
found in the system.Tools
Skin: selects the visual skin of the
application.
Language: to select the interface language. The
language file can be translated by anyone who feels like it. Please contact
APP Helmond to include your translation in the next
installer.
Preferences: opens the functional window for setting a couple
of generic options (more
help).
Start maximized: the interface usually works
best in full-screen, but sometimes this is not wanted. This option
can turn the maximization at start on and
off.
Create mosaic: in some rare
occasions the interface is larger/higher than the screen (e.g. small
laptops) and the 'Create mosaic' button can be
obscured. Use this 'button' to create a mosaic
instead.
Show license information: the application is freeware for 15 days, after which a
license is required for outputting the results. This menu part will show the
license status (days left, licensee name), and allows for loading the
purchased license file in the application (
more
help
).
Check for update: when new versions are available, use
this to check the internet for updates. It will start download when so
wished.
About: about us and version
information.
Help: this will open your default internet browser
and opens this web-based help documentation. For convenience
a stand-alone help-file can be downloaded via the
website.
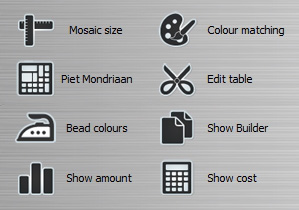
Mosaic size: opens the functional window for setting the
mosaic size.
Colour matching: opens the functional window for selecting
the colour matching engines.
Piet Mondriaan: opens the Mondriaan controls and shows the painting
colour correction controls (more
help).
Edit table: opens the functional window for editing the
colour-brick combination table.
Picture library : (not shown in the
picture above, only when a brick dataset is active) will start the
picture library functionality. In that case you can use real pictures
from bricks etc. as the mosaic view. It's a very realistic way to get a peek preview of how
your real world mosaic would look like.
Beads colours : (shown here) opens the functional window for selecting any
of the 4 pre-installed bead colour sets.
Ministeck set: (not shown in the
picture above, only when a Ministeck® dataset is active) opens the functional window for setting
basic date on the Ministeck® set prices, incl some lay-out options.
Show builder: opens the mosaic
Builder. Becomes active when a mosaic is made, and the Builder memory is sufficient to edit
the mosaic bricks (more
help).
Show cost: opens the overview of the cost of all the used
bricks/parts and colours. Becomes active when a mosaic is made.
Show amount: opens the overview of the amount of used
bricks/parts and colours. Becomes active when a mosaic is made.
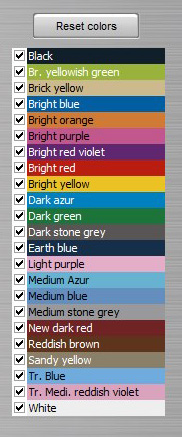
On the right the currently
available colours are shown. These colours are represented by checkboxes. At
start all the colours are checked, meaning: they are taken into the colour
selection of the mosaic. When a mosaic is created, only the colours that are
checked are taken into the colour-brick palette. Unchecked colours stay visible.
Only when the current set is saved as a new colour table, only the active
colours are shown. For that reason the original 'LegoNoFile.xml' should
never
be overwritten.
There are
just two 'real' buttons in
the main GUI. By pressing the 'Create
mosaic' button
(obviously) the mosaic is created with the currently
available settings and values. The other button 'Reset
colours' is used to reset the colour table on the right, basically checking
all the tick-boxes again. This way the colour palette is quickly reset. In case a
different source picture, colour table or colour matching engine is selected this
table is automatically reset.
When you check the option 'Show
follow-me text'
the cursor will show the nearest brick information: colour and size. This
is identical to a similar option in the mosaic brick Builder. However,
in case you have created a sideways mosaic (see here for details), the Builder will only show
1-stud bricks only. That is caused by the internal building and brick data
management. So, when you open the Builder of a sideway mosaic you will notice
that e.g. a 2x2 brick is now shown as 2x1 brick. No worries, the data is OK and
the blueprint excel file is correct. But technically you have a 1-stud high
brick when showing the mosaic sideways.